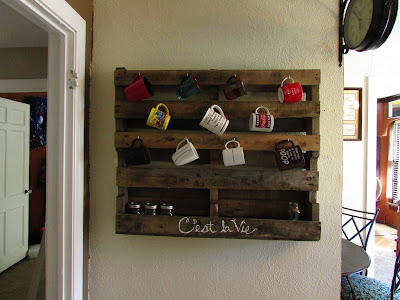
I love coffee. I also love storage. These are two things I always seem to be running out of and they drive me equally crazy. That's why when I saw this little gem on Pinterest, I knew exactly what I needed to do.
 |
| Image via Pinterest |
The first thing I had to do was locate a pallet. This turned out to be as simple as posting to Facebook "Looking for a pallet, any condition." I had one the next day for free. Side note- pallets are so much heavier than I had ever imagined; and the one I was given took a lot of elbow grease, experience playing Tetris, and a donation of a vertebrae to get into my SUV.
I had never worked with a pallet before, so I don't know a lot about them. I do know that mine was VERY large. Also, since I did not specify a specific condition, it had lots of cracks and mismatched beams which I ended up really loving about it.
A quick trip to The Home Depot landed me with a 50 pack of cup hooks and a heavy duty picture bracket for about $15. I love the look of the coat hooks from the photo on Pinterest, but at more than $3 a pop, I found a much cheaper option.
 |
| Original Pallet |
 |
| Husband being manly |
I should really start off by stating that I was solely the brains of the operation, the husband ended up being the brawn (under my supervision of course). The first thing I had him do was flip it so we were looking at the what would be the top side if it were laying in its working position, then saw off a large portion from the top. We then had the idea to use one of the beams that were removed and attach it to the bottom to form a shelf for all my other crap that I never have enough room for.
When it came to this particular project, I am the kind of lady that finds the imperfections to be more beautiful than annoying, so we did not even out or saw down any crooked beams, including the top one that the hanging bracket was mounted to. The use of a level in this case was very important, because our eyes would have certainly deceived us. (The bracket we chose included a small mini level, but the husband had his own.)
As it turned out, the stencils that I had once borrowed from my sister that I swore I stole had ended up back at her house, so we free handed "C'est la vie" onto the bottom using a third world paint brush and 4 year old interior paint. (I never said I'm frugal, I'm definitely cheap and on a budget.) If anyone asks, I'll just say our 2 year old did it with a white crayon.
 |
| My only physical contribution. |
The cup hooks were easiest in the worn beams, the husband had to use a little more effort on one of the fresher looking beams. We chose to stagger them between rows to avoid any chance of my cups not fitting properly. The husband used a pair of pliers to pull the ends of the hooks upward for the handles to fit, essentially changing from a "C" shape to a "J" shape. From here, it was only a matter of finding somewhere to fit this gargantuous piece and hang it up. Yes, we actually removed a (useless) door in our kitchen to give it a home. I'm extremely pleased with how it turned out. I chose not to sand, stain or paint it, but there are so many different ways that a project like this could be personalized to fit any style.


You sure are lucky to have such an a we some husband/handyman (not to mention some fine looking eye candy). The project looks like it turned out very well. LOVE the worn look if the wood and I wouldn't have painted or stained it either
ReplyDelete